Person tutorial
This tutorial expands on the “Hello World” Tutorial to introduce the concepts of reusable component declarations and components from the standard widget library in Enaml. It sets up a GUI with the name and age of a person.
Here is the Enaml file (download here):
#------------------------------------------------------------------------------
# Copyright (c) 2013-2025, Nucleic Development Team.
#
# Distributed under the terms of the Modified BSD License.
#
# The full license is in the file LICENSE, distributed with this software.
#------------------------------------------------------------------------------
from enaml.widgets.api import Window, Label, Field, Form
from enaml.stdlib.fields import IntField


enamldef PersonForm(Form):
    attr person
    Label:
        text = 'First Name'
    Field:
        text := person.first_name
    Label:
        text = 'Last Name'
    Field:
        text := person.last_name
    Label:
        text = 'Age'
    IntField:
        minimum = 0
        value := person.age


enamldef PersonView(Window):
    attr person
    PersonForm:
        person := parent.person
Here is the Python code (download here):
#------------------------------------------------------------------------------
# Copyright (c) 2013-2025, Nucleic Development Team.
#
# Distributed under the terms of the Modified BSD License.
#
# The full license is in the file LICENSE, distributed with this software.
#------------------------------------------------------------------------------
from __future__ import unicode_literals, print_function

from atom.api import Atom, Str, Range, Bool, observe

import enaml
from enaml.qt.qt_application import QtApplication

import sys, os
sys.path.append(os.path.dirname(os.path.abspath(__file__)))

class Person(Atom):
    """ A simple class representing a person object.

    """
    last_name = Str()

    first_name = Str()

    age = Range(low=0)

    debug = Bool(False)

    @observe('age')
    def debug_print(self, change):
        """ Prints out a debug message whenever the person's age changes.

        """
        if self.debug:
            templ = "{first} {last} is {age} years old."
            s = templ.format(
                first=self.first_name, last=self.last_name, age=self.age,
            )
            print(s)


def main():
    with enaml.imports():
        from person_view import PersonView

    john = Person(first_name='John', last_name='Doe', age=42)
    john.debug = True

    app = QtApplication()
    view = PersonView(person=john)
    view.show()

    app.start()

if __name__ == '__main__':
    main()
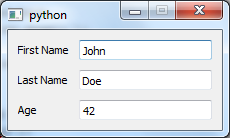
The resulting GUI looks like this (on Windows 7):
Enaml Imports
This .enaml file begins like the “Hello World” example
with comments, but next we see that we can import other .enaml files in Enaml,
just like we can import .py files.:
from enaml.stdlib.fields import IntField
In this case, we are importing the integer field widget IntField from
Enaml’s standard widget library. This widget
lets us assign an integer to the value attribute of the widget. The
widget automatically converts to and from the text representation of the
integer complete with validation and error checking.
Note that this import points to a widget definition in an .enaml file.
The import statement looks like Python but imports from an .enaml file.
PersonForm Definition Block
Next, there is a component definition block. We define a component, in this case an entry form, using a component hierarchy definition. With this block of code, we define a reusable component derived from other components.
enamldef PersonForm(Form):
    attr person
    Label:
        text = 'First Name'
    Field:
        text := person.first_name
    Label:
        text = 'Last Name'
    Field:
        text := person.last_name
    Label:
        text = 'Age'
    IntField:
        minimum = 0
        value := person.age
A component definition block header line begins with enamldef followed by
the name of the component followed by the base component or widget from which
it inherits. A widget defined with enamldef must inherit from a builtin
widget or another enamldef. The header line ends with a colon:
enamldef PersonForm(Form):
Indented under the header line are statements declaring either attributes or
children. attr person declares a person attribute of PersonForm.
Because no default value is specified, this attribute must be supplied by code
which uses the PersonForm.
Built-in Components
Next, we add a series of labels and fields. Form, Label and Field
are all from the library of Enaml built-in widgets.
Form is a built-in container that arranges
alternating child components into two columns. This is typically done in the
way seen here with alternating Label and widget children, though there
are no restrictions on the types of widgets which can be used. In a form with
an odd number of components, the last component spans both columns.
Label is a built-in component for displaying
read-only text.
Field is a built-in widget for entering a text
value. Field is used as the base component for many other components that do
type conversions.
Delegation Operator :=
In the Field code block, we notice a new operator :=. This is the
delegation operator, one of the five special operators in
the Enaml grammar. It sets up a two-way synchronization
between the objects on the left-hand and right-hand sides. That is, changes to
the value of the text field in the GUI widget are applied to the value of
person.first_name, and changes to the value of person.first_name are
displayed in the GUI component.
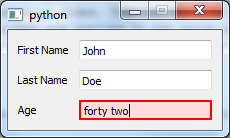
Standard Library of Derived Components
The IntField component is derived from Field and provides
string-to-integer conversion, validation, and error reporting functions. By
using the IntField component, we add validation to the GUI, as shown in the
example below, where a non-integer value was entered in the age field:
PersonView Definitions Block
Now, with another enamldef block, we can make a view available using our
previously declared PersonForm. If we wanted to, we could add PersonForm
many times over in this view or any other view, but for now we’ll keep it
simple. Note that we will pass a person object to the view when we create
an instance of it.
enamldef PersonView(Window):
    attr person
    PersonForm:
        person = parent.person
Now, on to the Python code.
Atom Object
Enaml is designed to be model framework independent and ships with a formal
API for attaching to any Python model framework which provides notification of
state change. However, Enaml itself is built with Atom and will work
with Atom objects out of the
box. The important thing to note is that the Person attribute names match
the attribute names of the person object used by the PersonForm in the
.enaml file.
class Person(Atom):
   """ A simple class representing a person object.

   """
   last_name = Str()

   first_name = Str()

   age = Range(low=0)

   debug = Bool(False)

   @observe('age')
   def debug_print(self, change):
       """ Prints out a debug message whenever the person's age changes.

       """
       if self.debug:
           templ = "{first} {last} is {age} years old."
           s = templ.format(
               first=self.first_name, last=self.last_name, age=self.age,
           )
           print s
Note that our Person class is designed to print out the name and age of the
person when the age attribute changes.
Hooking up an Enaml View to an Atom Object
In the code block for launching the script from the command line, we create a
Person object and create an application which serves it using the
PersonView for the GUI:
if __name__ == '__main__':
    with enaml.imports():
        from person_view import PersonView

    john = Person(first_name='John', last_name='Doe', age=42)
    john.debug = True

    app = QtApplication()
    view = PersonView(person=john)
    view.show()

    app.start()
Running it from the command line, we see
$ python person.py
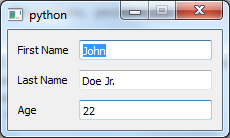
We can then make a change in the GUI and see:
John Doe Jr. is 22 years old.