“Hello World” tutorial
Our goal in this tutorial is to show a minimal example of an Enaml user interface and introduce a few basic concepts. It sets up a minimal GUI to display a simple message.
Let’s get started with a minimalist “hello world” example. Enaml interfaces are described in a file with the “.enaml” extension. While the code has some similarities to Python, Enaml is a separate language.
Here is our minimalist .enaml file describing a message-displaying GUI
(download here):
#------------------------------------------------------------------------------
# Copyright (c) 2013-2025, Nucleic Development Team.
#
# Distributed under the terms of the Modified BSD License.
#
# The full license is in the file LICENSE, distributed with this software.
#------------------------------------------------------------------------------
from enaml.widgets.api import Window, Container, Label


enamldef Main(Window):
    attr message = "Hello, world!"
    Container:
        Label:
            text = message
Use the enaml-run utility to run it from the command line with
$ enaml-run hello_world_view.enaml
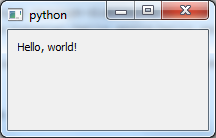
The resulting GUI looks like this (on Windows 7):
Let’s take a closer look at the Enaml file.
Enaml Definitions
An Enaml view is made up of a series of component definitions that look a
lot like Python classes. In the first line of code, we are defining a new
component, Main, which derives from Window, a builtin widget in the
Enaml library:
enamldef Main(Window):
With this line of code, we have defined the start of a definition block.
In general, we could call this almost anything we want, as long as it is a
Python-valid name. In this case, however, by giving it the special name Main
we get to run it from the command line with the enaml-run tool.
enaml-run looks for a component named Main or a function named main
in an .enaml file and runs it as a standalone application.
Definition Structure
Inside a definition block, the view is defined in a hierarchical tree of
widgets. As in Python ,
indentation is used to specify code block structure. That is, statements
beginning at a certain indentation level refer to the header line at the next
lower indentation level. So in our simple example, the Container belongs to
Main and the Label belongs to the Container:
enamldef Main(Window):
    attr message = "Hello, world!"
    Container:
        Label:
            text = message
The view is made up of a Window containing a Container which in
turn contains a Label, whose text attribute is set equal to the
message attribute of Main, which has a default value of
"Hello, world!". This default value can be changed by the code which
creates an instance of Main.
(We’ll discuss this in more detail in the next tutorial.)
Just like regular Python objects, the widgets used in an Enaml UI must be
defined and/or imported before they can be used. The widgets used in this
tutorial are imported from enaml.widgets.api.
Using the Enaml view in Python
Now we’ll take a look at how to use the view in Python code. First, we import Enaml:
import enaml
Then we use enaml.imports() as a context manager for importing
the Enaml view:
with enaml.imports():
    from hello_world_view import Main
Enaml is an inherently asynchronous toolkit, with a server running an application which offers UI sessions that a client may view. For this simple example, we’ll be working with the client and server both running locally and in the same process.
Next we need to create a toolkit specific application. This is typically the only toolkit-specific code in an Enaml application:
from enaml.qt.qt_application import QtApplication

app = QtApplication()
Then we create a view object, and call its show method:
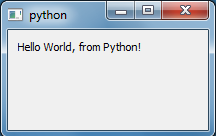
view = Main(message="Hello World, from Python!")
view.show()
Finally, we start the event loop:
# Start the application event loop
app.start()