Anatomy of Enaml
This article describes the core fundamentals for building an Enaml application. It proceeds by creating a simple runnable example which shows how the various syntactic constructs and frameworking components combine to create a UI application.
See also
For the motivations and background on Enaml, see the Introduction.
For connecting data models to the UI, see Enaml syntax and Data Models.
For advanced articles on the Enaml language and framework, see the Developer Guides.
Enaml Syntax
The Enaml syntax has been designed expressly for the ease of reading, writing, and visualizing user interfaces. The simplest way to become familiar with the syntax is to look at a code sample and break it down piece by piece. The snippet below is the code that will be used for the example in this article.
enamldef PersonView(Window):
    attr person
    title = 'Person View'
    Form:
        Label:
            text = 'First Name'
        Field:
            text := person.first_name
        Label:
            text = 'Last Name'
        Field:
            text := person.last_name
Before going any further, take a glance over the code and see if you can visualize how the UI will look and behave, despite the fact that you have no other knowledge of Enaml.
enamldef
The very first thing you’ll notice is a new keyword enamldef. Recall that
Enaml is a superset of the Python language and this keyword is one of Enaml’s
extensions to Python. The keyword is used to declare that the block of code
which follows is the definition of an Enaml view.
Tree Structure
Enaml describes a UI as a tree of elements. Like Python, the Enaml syntax is
sensitive to indentation, but where indentation in Python defines scope and
control flow, in Enaml it defines tree structure. Each successive level of
indentation in Enaml defines a parent-child relationship. In the example then,
the Label and Field elements are children of the Form, and the
Form is a child the PersonView.
Element State
Elements are customized by binding data to their attributes. In the example,
the text attributes of the Label elements and the title attribute
of the PersonView element are assigned static string values, and the
text attributes of the Field elements are bound to data in a data
model. The specifics of data model binding are covered in Enaml syntax and Data Models.
Changing the value of an element’s attributes will change the visual appearance of the widget in the view. The Enaml compiler ensures that a developer does not bind data to invalid attributes or to attributes which do not exist.
Inheritance
Enaml views can be extended through inheritance. In the example, PersonView
inherits from the builtin Window element, which reprents a top-level window
frame widget. It then defines a Form as the child of the window and which
will be automatically used as the main content of the window.
Inheritance in Enaml is not limited to the builtin elements. Any element which
is created with the enamldef keyword can be used as the base element for
another enamldef and therefore further customized. In fact, the language
requires a single base element in order to create a new enamldef.
Multiple inheritance is not supported.
Application Structure
An Enaml application consists of a collection of .enaml and .py files.
Canonically, the user interface definitions for the application live in the
.enaml files, and the application data models and business logic live in
the .py files. There is typically an application entry point defined in a
.py file which imports the various user interface definitions and data
models, creates an instance of an Enaml application object, shows a window on
the screen, and then starts the application event loop. For anyone having
developed a user interface application before, this will all sound familiar.
View Files
The user interface definitions for an Enaml application live inside .enaml
files. Inside these files, the developer uses the language features provided
by the Enaml framework, along with regular Python code, to define the views
for the application. Since Enaml is a superset of the Python language, these
files can contain arbitrary Python code alongside the enamldef elements.
However, it is recommended that the contents of .enaml files be limited to
views and supporting code, and business logic and models be kept in separate
.py files.
The definition of the view for this example was provided above. The only thing
it needs to become a fully functional .enaml file is the addition of the
imports for the builtin elements:
# person_view.enaml
from enaml.widgets.api import Window, Form, Label, Field

enamldef PersonView(Window):
    attr person
    title = 'Person View'
    Form:
        Label:
            text = 'First Name'
        Field:
            text := person.first_name
        Label:
            text = 'Last Name'
        Field:
            text := person.last_name
Model Files
The application data models, business logic, and other support code live in
.py files. While Enaml has the capability to interface with nearly any
data model framework, it supports the Atom model framework out of the box.
The full discussion of working with data models is given in the Enaml syntax and Data Models
article. For now, the simple model given below is sufficient for the current
example, and should be fairly self-explanatory.
# person_model.py
from atom.api import Atom, Str

class Person(Atom):
    first_name = Str()
    last_name = Str()
Startup File
An Enaml application is launched with an entry point .py file. How this
file is implemented is left entirely up to the developer. At a minimum, it
must do three things:
Create an Enaml application instance.
Create an instance of an Enaml view and call
.show()on the view.Call
.start()on the application instance.
For the current example, the following startup file is used:
# main.py
import enaml
from enaml.qt.qt_application import QtApplication

from person_model import Person


if __name__ == '__main__':
    with enaml.imports():
        from person_view import PersonView

    john = Person(first_name='John', last_name='Doe')

    app = QtApplication()

    view = PersonView(person=john)
    view.show()

    app.start()
In the startup file, there are a couple of things to note:
the import of the
.enamlfile into the Python namespacethe creation of a toolkit specific application object.
Since the Enaml language is not valid Python (remember, Enaml is a superset
of Python), it must be transformed before it can be used from Python. The
enaml.imports() context manager is the gateway which makes this
transformation possible. From within that context, Python’s import statement
can be used to import .enaml files into a module’s namespace.
The second, less magical part of the startup file is the creation of the toolkit-specific application object. With rare exception, this is the only time when writing an Enaml application where the developer must code anything which relates to a specific toolkit backend. The application object which is created dictates which toolkit backend will be used to render the user interface. In this example, the Qt toolkit is used. If, for example, the developer wished to use another backend, an application object for that backend would be created instead.
Pulling it all together and launching the application results in the following view:
C:> python main.py
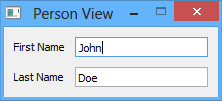
The structure of the window should come as no surprise, as it is directly reflected in the Enaml code from which it was created!